C++ map 刪除元素的 3 種方式

本篇將介紹如何使用 C++ map 刪除元素的 3 種方式,刪除 map 的元素有 3 種方式,
分別是

  • map 刪除指定的元素
  • map 刪除迭代器 iterator 指向的元素
  • map 刪除範圍內的元素

那就開始來介紹吧!

map 刪除指定的元素

C++ map 根據傳入的 key 值去刪除該元素,

std-map-erase.cpp
1
2
3
4
5
6
7
8
9
10
11
12
13
14
15
16
17
18
19
// g++ std-map-erase.cpp -o a.out -std=c++11
#include <iostream>
#include <string>
#include <map>

int main() {
std::map<int, std::string> studentMap;
studentMap[1] = "Tom";
studentMap[3] = "John";
studentMap[5] = "Tiffany";

studentMap.erase(1);

for (const auto& m : studentMap) {
std::cout << m.first << " " << m.second << "\n";
}

return 0;
}

結果如下,

1
2
3 John
5 Tiffany

那如果 map 刪除不存在的元素會發生什麼事呢?

std-map-erase2.cpp
1
2
3
4
5
6
7
8
9
10
11
12
13
14
15
16
17
18
19
20
21
22
23
24
25
// g++ std-map-erase2.cpp -o a.out -std=c++11
#include <iostream>
#include <string>
#include <map>

int main() {
std::map<int, std::string> studentMap;
studentMap[1] = "Tom";
studentMap[3] = "John";
studentMap[5] = "Tiffany";

auto ret = studentMap.erase(1);
std::cout << ret << "\n";
for (const auto& m : studentMap) {
std::cout << m.first << " " << m.second << "\n";
}

ret = studentMap.erase(2);
std::cout << ret << "\n";
for (const auto& m : studentMap) {
std::cout << m.first << " " << m.second << "\n";
}

return 0;
}

map 刪除不存在的元素並不會造成什麼 crash 這種嚴重問題,他反而會回傳一個數量告訴你它刪除了多少個元素,以這個例子來說 erase(1) 是刪除了 1 個元素,erase(2) 是刪除了 0 個元素,結果如下,

1
2
3
4
5
6
1
3 John
5 Tiffany
0
3 John
5 Tiffany

erase() 回傳的是 size_type,實際上是什麼變數型態,可以利用這篇的技巧來印出變數型態。

map 刪除迭代器 iterator 指向的元素

C++ map 根據帶入的 iterator 迭代器去刪除該元素,

std-map-erase3.cpp
1
2
3
4
5
6
7
8
9
10
11
12
13
14
15
16
17
18
19
20
21
// g++ std-map-erase3.cpp -o a.out -std=c++11
#include <iostream>
#include <string>
#include <map>

int main() {
std::map<int, std::string> studentMap;
studentMap[1] = "Tom";
studentMap[3] = "John";
studentMap[5] = "Tiffany";

std::map<int, std::string>::iterator it;
it = studentMap.find(3);
studentMap.erase(it);

for (const auto& m : studentMap) {
std::cout << m.first << " " << m.second << "\n";
}

return 0;
}

輸出結果如下,

1
2
1 Tom
5 Tiffany

來看看另外一種 map 的例子,

1
2
3
4
5
6
7
8
9
10
11
12
13
14
15
16
17
18
19
20
21
// g++ std-map-erase4.cpp -o a.out -std=c++11
#include <iostream>
#include <string>
#include <map>

int main() {
std::map<std::string, int> studentMap;
studentMap["Tom"] = 1;
studentMap["John"] = 3;
studentMap["Tiffany"] = 5;

std::map<std::string, int>::iterator it;
it = studentMap.find("John");
studentMap.erase(it);

for (const auto& m : studentMap) {
std::cout << m.first << " " << m.second << "\n";
}

return 0;
}

輸出結果如下,

1
2
Tiffany 5
Tom 1

map 刪除範圍內的元素

C++ map 根據帶入兩個 iterator 迭代器的範圍去刪除,這邊先用 find 來找好要刪除範圍的第一個 iter 與最後一個 iter,

1
2
3
4
5
6
7
8
9
10
11
12
13
14
15
16
17
18
19
20
21
22
23
24
25
26
27
28
29
// g++ std-map-erase5.cpp -o a.out -std=c++11
#include <iostream>
#include <string>
#include <map>

int main() {
std::map<int, std::string> studentMap;
studentMap[1] = "Tom";
studentMap[2] = "Jack";
studentMap[3] = "John";
studentMap[4] = "Ann";
studentMap[5] = "Tiffany";

std::map<int, std::string>::iterator first = studentMap.find(2);
std::map<int, std::string>::iterator last = studentMap.find(4);
studentMap.erase(first, last);
for (const auto& m : studentMap) {
std::cout << m.first << " " << m.second << "\n";
}

std::cout << "---\n";

studentMap.erase(studentMap.begin(), studentMap.end());
for (const auto& m : studentMap) {
std::cout << m.first << " " << m.second << "\n";
}

return 0;
}

結果如下,

1
2
3
4
1 Tom
4 Ann
5 Tiffany
---

如果要刪除所有的元素的話可以用 clear(),或者指定頭 begin() 到尾 end() 也可以,用法如下,

1
studentMap.erase(studentMap.begin(), studentMap.end());

其它參考
map::erase - C++ Reference
http://www.cplusplus.com/reference/map/map/erase/

其它相關文章推薦
如果你想學習 C++ 相關技術,可以參考看看下面的文章,
C/C++ 新手入門教學懶人包
std::map 用法與範例
std::unordered_map 用法與範例
std::vector 用法與範例
std::deque 介紹與用法
std::queue 用法與範例
std::thread 用法與範例
std::mutex 用法與範例
std::find 用法與範例
std::sort 用法與範例
std::random_shuffle 產生不重複的隨機亂數
std::shared_ptr 用法與範例
std::async 用法與範例

Python tkinter 修改標籤文字的 2 種方式

本篇 ShengYu 介紹 Python tkinter 修改標籤文字,在 Python tkinter 建立 label 標籤後可能會在之後的事件觸發時去修改標籤的文字,這邊就來介紹一下怎麼修改 label 的文字標題。

使用 tkinter label 的 text 屬性來修改標籤文字

這邊介紹第一種方式,使用 tkinter Label 的 text 屬性來修改標籤文字,也是最通用最簡單的方式,用法範例如下,
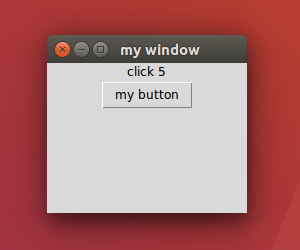
這個範例是先透過一個按鈕事件來去改變標籤文字,每按一次 Label 就會顯示點擊的次數,

python3-label-change-text.py
1
2
3
4
5
6
7
8
9
10
11
12
13
14
15
16
17
18
19
20
#!/usr/bin/env python3
# -*- coding: utf-8 -*-
import tkinter as tk
root = tk.Tk()
root.title('my window')
root.geometry('200x150')

mylabel = tk.Label(root, text='hello world')
mylabel.pack()

counter = 0
def button_event():
global counter
counter += 1
mylabel['text'] = 'click ' + str(counter)

mybutton = tk.Button(root, text='my button', command=button_event)
mybutton.pack()

root.mainloop()

設定 Label 的 text 屬性也可以透過 configure 的方式,寫法如下,

1
mylabel.configure(text = 'click ' + str(counter))

結果圖如下,

點擊 5 次後

用 StringVar 來修改 tkinter 標籤文字

第二種方式是宣告一個 StringVar 在建立 Label 時指定給 textvariable,這樣 Label 的文字就會跟 StringVar 的變數產生連動,當 StringVar 的變數產生改動時,也會同時反應在 Label 的文字,注意不是指定給 text 唷!
這樣之後在事件觸發後針對 StringVar 來進行修改就可以了,用法範例如下,

python3-label-change-text2.py
1
2
3
4
5
6
7
8
9
10
11
12
13
14
15
16
17
18
19
20
21
22
23
#!/usr/bin/env python3
# -*- coding: utf-8 -*-
import tkinter as tk
root = tk.Tk()
root.title('my window')
root.geometry('200x150')

text = tk.StringVar()
text.set('hello world')

mylabel = tk.Label(root, textvariable=text)
mylabel.pack()

counter = 0
def button_event():
global counter
counter += 1
text.set('click ' + str(counter))

mybutton = tk.Button(root, text='my button', command=button_event)
mybutton.pack()

root.mainloop()

其它相關文章推薦
Python tkinter 標籤用法與範例
Python 新手入門教學懶人包
Python tkinter 新手入門教學

C/C++ 字串比較的3種方法

本篇 ShengYu 介紹 C/C++ 字串比較的3種方法,寫程式中字串比較是基本功夫,而且也蠻常會用到的,所以這邊紀錄我曾經用過與所知道的字串比較的幾種方式,
以下為 C/C++ 字串比較的內容章節,

  • C 語言的 strcmp
  • C++ string 的 compare()
  • C++ string 的 == operator

那我們就開始吧!

C 語言的 strcmp

C 語言要判斷 c-style 字串是否相等通常會使用 strcmp,要使用 strcmp 的話需要引入的標頭檔 <string.h>
strcmp 函式原型為

1
int strcmp(const char * str1, const char * str2);

strcmp() 如果判斷兩字串相等的話會回傳 0,這必須牢記因為很容易混搖,很多程式 bug 就是這樣產生的,來看看下面的 strcmp 用法範例吧!

cpp-string-compare.cpp
1
2
3
4
5
6
7
8
9
10
11
12
13
14
15
16
// g++ cpp-string-compare.cpp -o a.out
#include <stdio.h>
#include <string.h>

int main() {
const char *str1 = "hello world";
const char *str2 = "hello world";

if (strcmp(str1, str2) == 0) {
printf("equal\n");
} else {
printf("not equal\n");
}

return 0;
}

結果如下,

1
equal

再來看看字串不相等的例子,strcmp 是大小寫都判斷不同的,

cpp-string-compare2.cpp
1
2
3
4
5
6
7
8
9
10
11
12
13
14
15
16
// g++ cpp-string-compare2.cpp -o a.out
#include <stdio.h>
#include <string.h>

int main() {
const char *str1 = "hello world";
const char *str2 = "Hello World";

if (strcmp(str1, str2) == 0) {
printf("equal\n");
} else {
printf("not equal\n");
}

return 0;
}

結果如下,

1
not equal

注意唷!if (strcmp(str1, str2)) printf("not equal\n"); 這樣是不相等唷!
如果要用 strcmp 來判斷 std::string 的話可以這樣寫,

1
2
3
4
5
string str1 = "hello world";
string str2 = "hello world";
if (strcmp(str1.c_str(), str2.c_str()) == 0) {
printf("equal\n");
}

不過比較 std::string 應該很少這樣寫,除非是什麼特殊情形,否則我們都會使用下列介紹的兩種方式,

C++ string 的 compare()

這邊介紹 C++ string 的 compare()string::compare() 可以跟 std::string 做判斷以外也可以跟 c-style 字串作判斷,
string::compare() 判斷字串相等的話會回傳 0,

cpp-string-compare3.cpp
1
2
3
4
5
6
7
8
9
10
11
12
13
14
15
16
17
18
19
20
21
22
23
// g++ cpp-string-compare3.cpp -o a.out
#include <iostream>
#include <string>
using namespace std;

int main() {
string str1 = "hello world";
string str2("hello world");

if (str1.compare("Hello World") == 0) {
cout << "equal\n";
} else {
cout << "not equal\n";
}

if (str1.compare(str2) == 0) {
cout << "equal\n";
} else {
cout << "not equal\n";
}

return 0;
}

結果如下,第一組判斷出大小寫不相同所以印出 not equal,

1
2
not equal
equal

C++ string 的 == operator

最後要介紹的是 C++ string 的 == operator,也算是最直覺的一種寫法,直接用 == 來判斷兩字串是否相等,其他很多程式語言也都是這樣寫的,所以這寫法可以說是最直覺了,這邊同時也一起示範 != 的方式,

cpp-string-compare4.cpp
1
2
3
4
5
6
7
8
9
10
11
12
13
14
15
16
17
18
19
20
21
22
23
24
25
26
27
28
29
30
31
32
33
34
35
36
37
// g++ cpp-string-compare4.cpp -o a.out
#include <iostream>
#include <string>
using namespace std;

int main() {
string str1 = "hello world";
string str2("hello world");

// ==
if (str1 == "Hello World") {
cout << "equal\n";
} else {
cout << "not equal\n";
}

if (str1 == str2) {
cout << "equal\n";
} else {
cout << "not equal\n";
}

// !=
if (str1 != "Hello World") {
cout << "equal\n";
} else {
cout << "not equal\n";
}

if (str1 != str2) {
cout << "equal\n";
} else {
cout << "not equal\n";
}

return 0;
}

結果如下,

1
2
3
4
not equal
equal
equal
not equal

以上就是 C/C++ 字串比較的3種方法介紹,
如果你覺得我的文章寫得不錯、對你有幫助的話記得 Facebook 按讚支持一下!

其它參考
strcmp - C++ Reference
https://www.cplusplus.com/reference/cstring/strcmp/

其它相關文章推薦
如果你想學習 C++ 相關技術,可以參考看看下面的文章,
C/C++ 新手入門教學懶人包
C/C++ 字串連接的3種方法
C/C++ 字串搜尋的3種方法
C/C++ 字串分割的3種方法

C++ std::set 用法與範例

本篇 ShengYu 介紹 C++ std set 用法與範例,C++ std::set 是一個關聯式容器,set 容器裡面的元素是唯一的,具有不重複的特性,而且是有排序的容器,set 容器裡面元素的值是不可修改,但 set 容器可以插入或刪除元素,set 的實作方式通常是用紅黑樹(red-black tree)實作的。

以下 C++ set 用法與範例將分為這幾部分,

  • set 初始化用法
  • set 插入元素與讀取元素
  • 迴圈遍歷 set 容器
  • set 刪除指定元素
  • 清空 set 元素
  • 判斷 set 容器是否為空
  • set 判斷元素是否存在
  • std::set 和 std::vector 有什麼不同?

要使用 set 容器的話,需要引入的標頭檔<set>

set 初始化用法

C++ set 初始化用法如下,

1
std::set<int> myset{1, 2, 3, 4, 5};

從 c-style 陣列來初始化

1
2
int arr[] = {1, 2, 3, 4, 5};
std::set<int> myset(arr, arr+5);

set 插入元素與讀取元素

set 插入元素的用法如下,

1
2
3
4
5
6
std::set<int> myset;
myset.insert(1);
myset.insert(2);
myset.insert(3);
myset.insert(4);
myset.insert(5);

由於 set 容器中沒有 at() 成員函數,也沒有 operator[],set 無法單純地隨機讀取某元素,但能透過 iterator 來讀取元素,可參考下節的介紹。

迴圈遍歷 set 容器

迴圈遍歷 set 容器的方式有幾種,
以下先介紹使用 range-based for loop 來遍歷 set 容器並且印出來,這邊故意將元素不按順序初始化以及插入,然後我們再來觀察看看是不是 set 會將其排序,同時看看是不是具有不重複性,

std-set.cpp
1
2
3
4
5
6
7
8
9
10
11
12
13
14
15
16
17
18
19
// g++ std-set.cpp -o a.out -std=c++11
#include <iostream>
#include <set>

int main() {
std::set<int> myset = {3, 1};
myset.insert(2);
myset.insert(5);
myset.insert(4);
myset.insert(5);
myset.insert(4);

for (const auto &s : myset) {
std::cout << s << " ";
}
std::cout << "\n";

return 0;
}

輸出內容如下,從這個輸出結果發現是元素是由小到大排列,所以 set 容器裡面真的是會幫你排序的,在插入元素的同時會根據元素來進行排序,並且沒有元素重複

1
1 2 3 4 5

迴圈也可以使用迭代器的方式,用法如下,

1
2
3
4
5
6
for (std::set<int>::iterator it = myset.begin(); it != myset.end(); it++) {
// or
// for (auto it = myset.begin(); it != myset.end(); it++) {
std::cout << *it << " ";
}
std::cout << "\n";

如果要從後面印到前面的話,可以使用反向迭代器,如果嫌 iterator 迭代器名稱太長的話可以善用 auto 關鍵字讓編譯器去推導該變數類型,用法如下,

1
2
3
4
5
6
// for (std::set<int>::reverse_iterator it = myset.rbegin(); it != myset.rend(); it++) {
// or
for (auto it = myset.rbegin(); it != myset.rend(); it++) {
std::cout << *it << " ";
}
std::cout << "\n";

使用反向迭代器的輸出結果如下,

1
5 4 3 2 1

set 刪除指定元素

以下是 set 刪除指定元素的用法,set 刪除指定元素要使用 erase()

std-set2.cpp
1
2
3
4
5
6
7
8
9
10
11
12
13
14
15
// g++ std-set2.cpp -o a.out -std=c++11
#include <iostream>
#include <set>

int main() {
std::set<int> myset{2, 4, 6, 8};

myset.erase(2);
for (const auto &s : myset) {
std::cout << s << " ";
}
std::cout << "\n";

return 0;
}

結果如下,

1
4 6 8

那 set 刪除不存在的元素呢?

std-set3.cpp
1
2
3
4
5
6
7
8
9
10
11
12
13
14
15
16
17
18
19
20
21
22
23
// g++ std-set3.cpp -o a.out -std=c++11
#include <iostream>
#include <set>

int main() {
std::set<int> myset{2, 4, 6, 8};

auto ret = myset.erase(2);
std::cout << ret << "\n";
for (const auto &s : myset) {
std::cout << s << " ";
}
std::cout << "\n";

ret = myset.erase(3);
std::cout << ret << "\n";
for (const auto &s : myset) {
std::cout << s << " ";
}
std::cout << "\n";

return 0;
}

結果是可以這麼作的,不會發生什麼事。另外會回傳告訴你刪除了幾個元素。

1
2
3
4
1
4 6 8
0
4 6 8

set erase() 刪除元素還有另外兩種用法,關於這部分下次我再寫一篇給大家講解。

清空 set 元素

要清空 set 容器的的話,要使用 clear()

1
2
3
4
5
6
std::set<int> myset;
myset.insert(1);
myset.insert(2);
myset.insert(3);

myset.clear();

set 判斷元素是否存在

set 要判斷指定元素是否存在的話有兩種方法,
第一種方法是使用 count() 成員函式,count() 存在該元素的話回傳 1,不存在的話回傳 0,

1
2
3
4
5
6
std::set<int> myset;
myset.insert(2);
myset.insert(4);
myset.insert(6);
std::cout << myset.count(4) << "\n"; // 1
std::cout << myset.count(8) << "\n"; // 0

換成 char 字元試試,

1
2
3
4
5
6
7
std::set<char> myset;
myset.insert('a');
myset.insert('b');
myset.insert('c');
std::cout << myset.count('a') << "\n"; // 1
std::cout << myset.count('c') << "\n"; // 1
std::cout << myset.count('d') << "\n"; // 0

第二種方法是使用 find() 成員函式來判斷指定元素是否存在,
count() 不同的是 find() 有找到該指定元素的話會回傳指向該特定元素的 iterator,否則回傳 past-the-end (end()) iterator
以下範例示範在一個 int 整數的 set 裡使用 find(2) 搜尋看看有沒有 2 這個元素,

1
2
3
4
5
6
7
std::set<int> myset = {2, 4, 6};
auto search = myset.find(2);
if (search != myset.end()) {
std::cout << "Found " << *search << "\n"; // Found 2
} else {
std::cout << "Not found\n";
}

換成 std::string 字串試試,

1
2
3
4
5
6
7
8
std::set<std::string> myset = {"Tom", "Jack", "John"};
std::string key = "Tom";
auto search = myset.find(key);
if (search != myset.end()) {
std::cout << "Found " << *search << "\n"; // Found Tom
} else {
std::cout << "Not found\n";
}

判斷 set 容器是否為空

要判斷 set 是否為空或是裡面有沒有元素的話,可以用 empty(),寫法如下,

std-set4.cpp
1
2
3
4
5
6
7
8
9
10
11
12
13
14
15
16
// g++ std-set4.cpp -o a.out -std=c++11
#include <iostream>
#include <set>

int main() {
std::set<int> myset;
myset.clear();

if (myset.empty()) {
std::cout << "empty\n";
} else {
std::cout << "not empty, size is "<< myset.size() <<"\n";
}

return 0;
}

結果如下,

1
empty

std::set 和 std::vector 有什麼不同?

  • 唯一性
    set 跟 vector 不同之處是 set 容器裡面的元素是唯一的,具有不重複的特性,vector 則沒有這個限制。
  • 不可修改性
    vector 可以修改元素的值,但 set 容器裡面元素的值是不可修改的。
  • 順序性
    set 是有序的,也就是裡面的元素會按照特定順序擺放,跟插入順序無關,vector 則不是。

其它參考
set - C++ Reference
http://www.cplusplus.com/reference/set/set/
std::set - cppreference.com
https://en.cppreference.com/w/cpp/container/set
C++ set新增、刪除和存取(STL set新增、刪除和存取)元素詳解
https://tw511.com/a/01/1324.html
c++ - What is the difference between std::set and std::vector? - Stack Overflow
https://stackoverflow.com/questions/8686725/what-is-the-difference-between-stdset-and-stdvector

其它相關文章推薦
如果你想學習 C++ 相關技術,可以參考看看下面的文章,
C/C++ 新手入門教學懶人包
std::unordered_set 用法與範例
std::map 用法與範例
std::unordered_map 用法與範例
std::vector 用法與範例
std::deque 介紹與用法
std::queue 用法與範例
std::thread 用法與範例
std::mutex 用法與範例
std::find 用法與範例
std::sort 用法與範例
std::random_shuffle 產生不重複的隨機亂數
std::shared_ptr 用法與範例
std::async 用法與範例

Hexo 新增自定義標籤外掛

本篇紀錄 Hexo 新增自定義標籤外掛的方法,Hexo 本身有很多標籤外掛可以使用,例如:codeblockpost_link等等,這邊要來新增我們自定義的標籤。

自定義的標籤路徑在哪裡?

每個 Hexo 的主題都有自己自定義的標籤,可以在下列路徑找到,

1
themes/<theme>/scripts/xxx.js

已內建的 landscape 主題為例,fancybox.js 就是一個自定義的標籤外掛,

1
themes/landscape/scripts/fancybox.js

新增自定義的標籤

以下就示範簡單的自定義的標籤方法,假設我要新增一個標籤叫做 {% link %},在文章內使用時都能轉換成 <a href="https://xxx">,對應的 js 如下,

1
2
3
4
5
6
7
8
function mylink(args) {
var html = [
'<a href="https://xxx">'
];
return html;
}

hexo.extend.tag.register('link', mylink);

這個 js 放在 themes/<theme>/scripts/mylink.js 下,接下來在 md 文章中可以寫 {% link %} 就會自動轉換成我們設定的 <a href="https://xxx"> 文字了!

其他參考
javascript - How to render fetched data in Hexo using custom tag plugin? - Stack Overflow
https://stackoverflow.com/questions/57206064/how-to-render-fetched-data-in-hexo-using-custom-tag-plugin
Insert common used data with a custom tag plugin in hexo blog engine | Nonostante Games
https://www.nonostante.io/devblog/2016-10-06-insert-common-used-data-with-a-custom-tag-plugin-in-hexo-blog-engine.html
Hexo 添加自定义的内置标签
https://my.oschina.net/u/4406323/blog/3894378
在 Hugo 文章中新增 Adsense 廣告單元_River’s Site - MdEditor
https://www.mdeditor.tw/pl/21kI/zh-tw

相關文章
Hexo 使用 Google Analytics 進行網站流量分析
Hexo 本機測試時如何關閉 Google Analytics
Hexo codeblock 插入程式碼區塊與各種程式語言預覽
升級更新 Hexo upgrade
Ubuntu 安裝 Hexo
Mac OS 安裝 Hexo

Shell Script 取得 mac address 的方法

本篇記錄 Shell Script 取得 mac address 的方法

shellscript-get-ip.sh
1
2
3
4
#!/bin/bash

MACADDR=`ifconfig eth0 | awk '/HWaddr/ {print $NF}'`
echo "$MACADDR"

執行結果如下,

1
aa:00:11:2b:3c:d4

其它參考
linux - Get MAC address using shell script - Stack Overflow
https://stackoverflow.com/questions/23828413/get-mac-address-using-shell-script
awk - bash script to get MAC address and paste it to ifconfig file after HWADDR - Unix & Linux Stack Exchange
https://unix.stackexchange.com/questions/564175/bash-script-to-get-mac-address-and-paste-it-to-ifconfig-file-after-hwaddr

其它相關文章推薦
Shell Script 新手入門教學
Shell Script 四則運算,變數相加、相減、相乘、相除
Shell Script if 條件判斷
Shell Script while 迴圈
Shell Script 讀檔,讀取 txt 文字檔

git clone 指定資料夾名稱

本篇介紹 git clone 指定資料夾名稱的方法,也就是 clone 下來專案資料夾改成我想要的資料夾名稱。

首先先簡單介紹 Git clone 用法,

1
git clone <遠端專案URL>

git clone 如果要指定資料夾名稱指令長這樣,例如我要 git clone myproject 下來並指定資料夾名稱為 newproject 的話,用法如下,

1
git clone git@github.com:user/myproject.git newproject

其他參考
How do you clone a Git repository into a specific folder? - Stack Overflow
https://stackoverflow.com/questions/651038/how-do-you-clone-a-git-repository-into-a-specific-folder

git clone 指定分支

本篇介紹 git clone 指定分支的方法,現在大部分專案的預設分支是 master,但如果平常使用的分支不是 master 的話,例如:dev 分支,就會需要 git clone 指定分支的需求,這樣專案 clone 下來就直接是 dev 分支了,接下來我們來學習怎麼 git clone 指定分支。

首先先簡單介紹 Git clone 用法,語法如下,

1
git clone <遠端專案URL>

git clone 不指定分支

以下是 git clone 不指定分支的方式,預設是 matser,最近 github 預設分支名稱改成 main,

1
git clone git@github.com:user/myproject.git

相信這個預設的方式應該大家都很熟悉。

git clone 指定分支

以下是 git clone 指定分支的語法,在 git clone 指令最後加上 -b 的參數,後面接上分支名稱,

1
git clone <遠端專案URL> -b <分支名稱>

或是用 --branch 的參數,

1
git clone <遠端專案URL> --branch <分支名稱>

git clone 指定分支的範例如下,假如我要 git clone 一個遠端的 myproject 專案且分支名稱是 dev 的話,用法如下,

1
git clone git@github.com:user/myproject.git -b dev

-b 參數也可以寫在前面,效果相同,

1
git clone -b dev git@github.com:user/myproject.git

之後可以用 git branch 來確認目前的分支,要切換分支的話使用 git checkout <分支名稱>

Python 檢查 set 集合是否為空

本篇介紹如何在 python 檢查 set 集合是否為空,

使用 not operator 運算子

使用 not operator 運算子來檢查 set 集合是否為空,
同時也是官方推薦的作法,

1
2
3
4
5
6
7
8
#!/usr/bin/env python3
# -*- coding: utf-8 -*-
myset = set()
print(type(myset))
print(myset)

if not myset:
print('myset is empty')

結果輸出:

1
2
3
<class 'set'>
set()
myset is empty

使用 len 判斷長度

使用 len() 函式來檢查 set 集合是否為空,

1
2
3
4
5
6
7
8
#!/usr/bin/env python3
# -*- coding: utf-8 -*-
myset = set()
print(type(myset))
print(len(myset))

if len(myset) == 0:
print('myset is empty')

結果輸出:

1
2
3
<class 'set'>
0
myset is empty

其它相關文章推薦
如果你想學習 Python 相關技術,可以參考看看下面的文章,
Python 新手入門教學懶人包
Python set 集合用法與範例

Python 取得 hostname 的方法

本篇介紹 Python 取得 hostname 的方法。

python3-get-hostname.py
1
2
3
4
5
6
#!/usr/bin/env python3
# -*- coding: utf-8 -*-
import socket

print(socket.gethostname())
print(socket.getfqdn(socket.gethostname()))

結果如下,

1
2
shengyu-PC
shengyu-PC

寫成函式的話,範例如下,

python3-get-hostname2.py
1
2
3
4
5
6
7
8
9
#!/usr/bin/env python3
# -*- coding: utf-8 -*-
import socket

def get_hostname():
hostname = socket.getfqdn(socket.gethostname())
return hostname

print(get_hostname())

其它參考
python - what’s the difference between gethostname and getfqdn? - Stack Overflow
https://stackoverflow.com/questions/13931924/whats-the-difference-between-gethostname-and-getfqdn

其它相關文章推薦
Python 新手入門教學懶人包
Python 讀取 txt 文字檔
Python 寫檔,寫入 txt 文字檔
Python 讀取 csv 檔案
Python 寫入 csv 檔案
Python 讀寫檔案
Python 產生 random 隨機不重複的數字 list
Python PyAutoGUI 使用教學
Python OpenCV resize 圖片縮放