使用 pyqt5 寫 python 視窗程式時,button 按鈕是最基本最常用的功能, 一定要學起來, 以下介紹如何在 pyqt5 的一個視窗裡建立 button 按鈕。
基本範例
1 | #!/usr/bin/env python3 |
結果如下圖: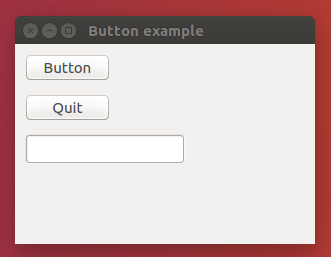
使用 pyqt5 寫 python 視窗程式時,button 按鈕是最基本最常用的功能, 一定要學起來, 以下介紹如何在 pyqt5 的一個視窗裡建立 button 按鈕。
基本範例
1 | #!/usr/bin/env python3 |
結果如下圖:
使用 pyqt5 寫 python 視窗程式時,menu 選單是最基本常用的功能, 以下介紹如何在 pyqt5 的一個視窗裡新增 menu 選單。
基本範例
1 | #!/usr/bin/env python3 |
結果如下圖: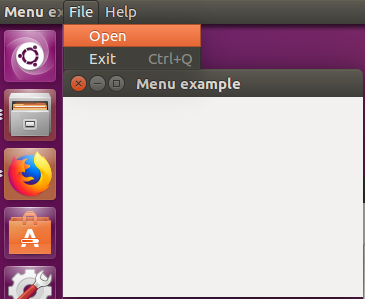
本篇 ShengYu 要介紹 Python dict 字典用法與範例,dict 字典是一個 key-value 對應的容器,能用鍵(key)來查詢對應的值(value),所以一個字典裡的 key 是不會重複的具有唯一性,dict 是 python 中很好用且常用的資料結構,dict 字典它可以動態地新增與刪除資料,字典 dict 裡的資料儲存沒有順序性,以下為 Python dict 用法介紹。
以下 Python dict 用法與範例分為這幾部份,
我們以學生編號與姓名為例,學生的編號(整數)為 key,value 的部分則是填入學生的姓名(字串),
Python 中 {} 大刮號表示 dict,
我們可以在 dict 初始化時給予起始資料,初始化 dict 的寫法如下,1
2
3
4
5
6
7#!/usr/bin/env python3
# -*- coding: utf-8 -*-
student_dict = {1:'tom', 2:'john', 3:'alice'}
print(type(student_dict))
print(len(student_dict))
print(student_dict)
結果輸出是這樣,1
2
3<class 'dict'>
3
{1: 'tom', 2: 'john', 3: 'alice'}
要根據 key 來取得 value 的話,如果 dict 帶入不存在的 key 的話執行時會出現錯誤,1
2
3
4
5student_dict = {1:'tom', 2:'john', 3:'alice'}
print(student_dict[1])
print(student_dict[2])
print(student_dict[3])
# print(student_dict[4]) # error
輸出如下,1
2
3tom
john
alice
那我們換個方式以學生姓名(字串)當作 key,學生編號(整數)當作 value 來試試看,1
2
3
4
5student_dict = {'tom':1, 'john':2, 'alice':3}
print(student_dict['tom'])
print(student_dict['john'])
print(student_dict['alice'])
# print(student_dict['jack']) # error
輸出如下,1
2
31
2
3
如果想建立一個空字典 dict 寫法為下,這時 student_dict 裡面是沒有任何資料的,1
2
3
4
5student_dict1 = {}
# 或者這樣寫
student_dict2 = dict()
print(student_dict1)
print(student_dict2)
輸出如下,1
2{}
{}
這邊我們反過來,以學生姓名(字串)為 key,學生的編號(整數)當 value,1
2
3
4
5
6
7
8
9student_dict = {}
student_dict['Tom']=100
student_dict['John']=102
student_dict['Alice']=101
print(student_dict['Tom'])
print(student_dict['John'])
print(student_dict['Alice'])
print(student_dict)
輸出結果為1
2
3
4100
102
101
{'John': 102, 'Alice': 101, 'Tom': 100}
印出 dict 字典裡所有元素最簡單的方式可以這樣寫1
2student_dict = {'Tom':100, 'John':102, 'Alice':101}
print(student_dict)
輸出結果為1
{'Tom': 100, 'John': 102, 'Alice': 101}
或是這樣1
2student_dict = {'Tom':100, 'John':102, 'Alice':101}
print(student_dict.items())
輸出結果為1
dict_items([('Tom', 100), ('John', 102), ('Alice', 101)])
或者用 for 迴圈迭代,像這樣1
2
3
4
5
6
7
8
9
10
11
12
13
14student_dict = {'Tom':100, 'John':102, 'Alice':101}
for key in student_dict:
print(key)
for key in student_dict.keys():
print(key)
for value in student_dict.values():
print(value)
# 迭代印出 key 與 value
for key, value in student_dict.items():
print(key + ': ' + str(value))
結果如下,1
2
3
4
5
6
7
8
9
10
11
12Tom
John
Alice
Tom
John
Alice
100
102
101
Tom: 100
John: 102
Alice: 101
如果不想按照 key 排序,想照 value 排序的話可以使用 python 的 sorted 函式,
這之前在 Python sort 排序 這篇介紹過了,有興趣的可以回去複習,
下面直接使用,1
2student_dict = {'Tom':100, 'John':102, 'Alice':101}
print(sorted(student_dict.items(), key=lambda x:x[1]))
結果如下,1
[('Tom', 100), ('Alice', 101), ('John', 102)]
這邊要注意的是 sorted 會回傳一個新的 list,所以如果要後續處理的話,
要用一個 list 去接,像下面這樣寫,印出來的結果跟上面一樣1
2
3
4student_dict = {'Tom':100, 'John':102, 'Alice':101}
student_list = [] # 宣告一個空的dict,可不寫
student_list = sorted(student_dict.items(), key=lambda x:x[1])
print(student_list)
dict 字典使用 del 來移除刪除元素,1
2
3
4student_dict = {'Tom':100, 'John':102, 'Alice':101}
del student_dict['Tom']
print(student_dict)
結果如下,1
{'John': 102, 'Alice': 101}
要清空 dict 字典裡所有的元素,使用 clear(),清空後這個字典裡面就空空了,也就變成一個空字典了,1
2
3
4student_dict = {'Tom':100, 'John':102, 'Alice':101}
student_dict.clear()
print(student_dict)
結果如下,1
{}
如果想毫不留情的刪除整個字典,之後再也不需要它的話,可以用 del,刪除後再去存取 dict 會執行錯誤唷!1
2
3
4student_dict = {'Tom':100, 'John':102, 'Alice':101}
del student_dict
# print(student_dict) # error
剛剛前述例子可以發現如果 dict 帶入不存在的 key 去存取 value 的話執行時就會出錯,但是假如今天我就是有這個需求想要試試看 dict 裡面有沒有這個 key,如果 key 有存在的話就回傳該 value,如果 key 沒有存在的話就回傳預設值,沒有給定預設值的話會回傳 None,1
2
3
4
5
6
7
8
9student_dict = {'Tom':100, 'John':102, 'Alice':101}
value1 = student_dict.get('Jack')
print(value1)
value2 = student_dict.get('Jack', 103)
print(value2)
value3 = student_dict.get('Alice')
print(value3)
value4 = student_dict.get('Alice', 104)
print(value4)
輸出結果如下,1
2
3
4None
103
101
101
下一篇將介紹 tuple 元組的用法
以上就是 Python dict 字典用法與範例介紹,
如果你覺得我的文章寫得不錯、對你有幫助的話記得 Facebook 按讚支持一下!
其它相關文章推薦
如果你想學習 Python 相關技術,可以參考看看下面的文章,
Python 檢查 dict 字典是否為空
Python 新手入門教學懶人包
Python str 字串用法與範例
Python list 串列用法與範例
Python set 集合用法與範例
Python tuple 元組用法與範例
本篇 ShengYu 要介紹 python list 串列用法與範例,list 串列是個簡單好用的東西,python 常常使用到,一定要學起來,list 串列它可以動態地新增與刪除資料,以下為 list 串列的基本範例。
以下 Python list 內容分為這幾部份,
python list 初始化的寫法如下,你可以初始化一個串列裡面都存放整數,也可以都放字串,也可以混合整數跟字串一起放,還可以放其他串列,用 type() 可以檢查這個變數的類型,1
2
3
4
5
6
7
8
9
10
11
12
13
14
15list1 = [1, 2, 3]
print(list1)
print(type(list1))
list2 = ['apple', 'banana', 'orange', 'tomato']
print(list2)
print(type(list2))
list3 = ['hello', 'world', 123, 456]
print(list3)
print(type(list3))
list4 = [list1, list2, list3]
print(list4)
print(type(list4))
輸出如下,1
2
3
4
5
6
7
8[1, 2, 3]
<class 'list'>
['apple', 'banana', 'orange', 'tomato']
<class 'list'>
['hello', 'world', 123, 456]
<class 'list'>
[[1, 2, 3], ['apple', 'banana', 'orange', 'tomato'], ['hello', 'world', 123, 456]]
<class 'list'>
如果想建立一個空串列 list 寫法為下,這時 list 裡面是沒有任何資料的,1
2
3
4
5
6
7list1 = []
# 或者這樣寫
list2 = list()
print(list1)
print(list2)
print(type(list1))
print(type(list2))
輸出如下,1
2
3
4[]
[]
<class 'list'>
<class 'list'>
python 要計算 list 串列的長度的話可以使用 len() 來計算,1
2list1 = [1, 2, 3, 4, 5]
print(len(list1))
輸出如下,1
5
利用串列索引值 index 來取得元素,索引值從 0 開始,第一個元素的索引值為 0,第二個元素的索引值為 1,依此類推,1
2
3
4list1 = [1, 2, 3 ,4 ,5]
print(list1[0])
print(list1[1])
print(list1[2])
輸出如下,1
2
31
2
3
串列索引值是 -1 表示串列的最後一個元素,索引值是 -2 表示串列的倒數第二個元素,索引值是 -n 表示串列的倒數第 n 個元素,依此類推,1
2
3
4list1 = [1, 2, 3 ,4 ,5]
print(list1[-1])
print(list1[-2])
print(list1[-3])
輸出如下,1
2
35
4
3
使用串列切片 slicing 來取得指定範圍內元素,更多串列切片 slicing 的教學範例請看這篇1
2
3
4
5
6list1 = [1, 2, 3 ,4 ,5]
print(list1[0:3]) # 串列索引值0到索引值3
print(list1[2:7]) # 串列索引值2到索引值7
print(list1[2:]) # 串列索引值2到最後
print(list1[:4]) # 串列前4個元素
print(list1[:]) # 串列所有元素
輸出如下,1
2
3
4
5[1, 2, 3]
[3, 4, 5]
[3, 4, 5]
[1, 2, 3, 4]
[1, 2, 3, 4, 5]
python 要將元素添加到 list 串列裡的話要使用 append(),1
2
3
4
5
6
7
8
9
10list1 = [1, 2, 3]
print(list1)
list1.append(4)
list1.append(5)
print(list1)
list2 = []
list2.append(1)
list2.append(2)
print(list2)
輸出如下,1
2
3[1, 2, 3]
[1, 2, 3, 4, 5]
[1, 2]
要修改串列元素的內容可以利用索引值來修改,方式如下,1
2
3
4
5
6
7
8
9
10list1 = [1, 2, 3 ,4 ,5]
print(list1)
list1[2] = 6
list1[4] = 7
print(list1)
list2 = ['apple', 'banana', 'orange']
print(list2)
list2[0] = 'tomato'
print(list2)
輸出如下,1
2
3
4[1, 2, 3, 4, 5]
[1, 2, 6, 4, 7]
['apple', 'banana', 'orange']
['tomato', 'banana', 'orange']
用 for 迴圈來遍歷巡訪串列 tuple 裡的所有元素並印出來,1
2
3list1 = ['hello', 'world', 123, 456]
for i in list1:
print(i)
輸出如下,1
2
3
4hello
world
123
456
更多 for 迴圈用法請看這篇
python 要刪除 list 串列裡的指定元素的話要使用 del,1
2
3
4
5
6list1 = [1, 2, 3, 4, 5]
print(list1)
del list1[0]
print(list1)
del list1[1]
print(list1)
輸出如下,1
2
3[1, 2, 3, 4, 5]
[2, 3, 4, 5]
[2, 4, 5]
要清空 list 串列裡所有的元素可以使用 clear(),清空後這個 list 裡面就空空了,也就變成一個空 list 串列了,1
2
3
4list1 = ['apple', 'banana', 'orange', 'tomato']
print(list1)
list1.clear()
print(list1)
輸出如下,1
2['apple', 'banana', 'orange', 'tomato']
[]
要刪除整個 list 串列的寫法如下,1
2
3
4list1 = [1, 2, 3, 4, 5]
print(list1)
del list1
# print(list1) # error
輸出如下,1
[1, 2, 3, 4, 5]
下一篇將介紹 set 集合的用法
以上就是 Python list 串列用法與範例介紹,
如果你覺得我的文章寫得不錯、對你有幫助的話記得 Facebook 按讚支持一下!
其它相關文章推薦
如果你想學習 Python 相關技術,可以參考看看下面的文章,
Python 串列切片
Python 檢查 list 列表是否為空
Python 新手入門教學懶人包
Python str 字串用法與範例
Python set 集合用法與範例
Python dict 字典用法與範例
Python tuple 元組用法與範例
本篇 ShengYu 要介紹 Python str 字串用法與範例,str 字串是 python 最基本的功能,以下為 Python str 字串的基本用法與範例。
以下 Python str 內容將分為這幾部份,
Python 的字串語法為文字前後加上兩個單引號 '' 或兩個雙引號 "",例如:'hello world' 或者 "hello world",依個人喜好或情境來選擇使用,例如今天如果遇到字串裡有包含 ' 像是 "ShengYu's notebook",就使用兩個雙引號來表示字串。
Python 字串的變數類型為 str,可以使用 type() 來檢查變數類型得知。
Python 字串可以使用 len() 來計算字串的長度。1
2
3
4s = 'hello world'
print(s)
print(type(s))
print(len(s))
輸出結果如下,1
2
3hello world
<class 'str'>
11
在 Python 上使用 + 加號來連接兩個字串,用法範例如下,1
2
3
4
5s1 = 'hello'
s2 = ' world'
s3 = s1 + s2
print(s3)
print('hello' + ' ' + 'world')
輸出結果如下,1
2hello world
hello world
這邊介紹字串索引或讀取字串裡的元素的方法1
2
3
4s = 'hello world'
print(s[0])
print(s[1])
print(s[2])
輸出結果如下,1
2
3h
e
l
字串索引值是 -1 表示字串的最後一個元素,索引值是 -2 表示字串的倒數第二個元素,索引值是 -n 表示字串的倒數第n個元素,依此類推,1
2
3
4s = 'hello world'
print(s[-1])
print(s[-2])
print(s[-3])
輸出結果如下,1
2
3d
l
r
用 for 迴圈來遍歷巡訪字串 str 裡的所有元素並印出來,1
2
3s = 'hello world'
for i in s:
print(i)
輸出結果如下,1
2
3
4
5
6
7
8
9
10
11h
e
l
l
o
w
o
r
l
d
更多 for 迴圈用法請看這篇
建立空字串方式如下,1
2
3
4
5
6
7
8
9s1 = ''
print(s1)
print(type(s1))
print(len(s1))
s2 = str()
print(s2)
print(type(s2))
print(len(s2))
輸出結果如下,1
2
3
4
5
6
<class 'str'>
0
<class 'str'>
0
字串切片就是基於原本字串中取得某區間的元素,例如:前幾個元素或後幾個元素等等,用法範例如下,1
2
3
4
5
6s = 'hello world'
print(s[0:3]) # 字串索引值0到索引值3
print(s[2:7]) # 字串索引值2到索引值7
print(s[2:]) # 字串索引值2到最後
print(s[:7]) # 字串前7個元素
print(s[:]) # 字串所有元素
輸出結果如下,1
2
3
4
5hel
llo w
llo world
hello w
hello world
詳細的字串切片用法與範例可以看這篇
字串切割也是常常用的的功能,簡單的字串切割空白作為分隔符號的用法範例如下,1
2s = 'hello world'
print(s.split())
輸出結果如下,1
['hello', 'world']
詳細的字串切割用法與範例可以看這篇
偶爾會需要將字串的空白或其他多餘的字元給去除,就要這樣使用,1
2s = ' hello world '
print(s.strip())
輸出結果如下,1
hello world
詳細的字串去除空白或其他多餘的字元用法與範例可以看這篇
str() 可以將整數或浮點數或其他變數類型的資料轉換為字串,用法範例如下,1
2
3
4
5
6
7
8
9n = 123
s1 = str(n)
print(type(n))
print(s1)
f = 123.456
s2 = str(f)
print(type(f))
print(s2)
輸出結果如下,1
2
3
4<class 'int'>
123
<class 'float'>
123.456
下一篇將介紹 list 串列的用法
以上就是 Python str 字串用法與範例介紹,
如果你覺得我的文章寫得不錯、對你有幫助的話記得 Facebook 按讚支持一下!
其它相關文章推薦
如果你想學習 Python 相關技術,可以參考看看下面的文章,
Python 字串切片
Python 檢查 str 字串是否為空
3 種 Python 字串搜尋並且忽略大小寫方法
4 種 Python 字串中搜尋關鍵字的方法
Python 新手入門教學懶人包
Python list 串列用法與範例
Python set 集合用法與範例
Python dict 字典用法與範例
Python tuple 元組用法與範例
在大型專案裡多人一起開發, 程式碼的 coding sytle 統一是個值得討論的議題,
統一 coding sytle 有下列好處:
以下介紹一個 c/c++ coding sytle 統一的好工具, clang-format
1 | sudo apt-get install clang-format |
輸入以下指令就會將 main.cpp 進行風格統一1
clang-format -i main.cpp
如果我只想針對我的修改部分做clang-format要怎麼做?
首先先將更動的檔案git add加入stage,
再使用git clang-format就會對stage裡檔案的修改部分進行clang-format重新排版。1
2
3git add <file>
...
git clang-format
VS Code 要先裝clang-format擴充套件才能夠對程式碼clang-format排版格式化,
格式化原始碼的快捷鍵為:
Ctrl + Shift + f (Windows)
Ctrl + Shift + i (Linux)
Option + Shift + f (MacOS)
也可以按右鍵選擇 Format Document。
如果目錄下有.clang-format檔會以這個檔裡設定值為主。
其他參考
使用 clang-format 對程式碼進行排版
https://hsins.me/blog/2019/05/27/format-source-code-with-clang-format/
在一般大型專案裡開發, 不管是公司還是開源專案裡, 開發貢獻專案的人一多, 各式各樣的風格就會呈現在程式碼,
這時通常很難沈住氣去讀code, 通常是邊讀邊罵, 這時就需要一杯咖啡靜下心來, 再好好地對付這些程式碼,
在沒有能力去統一這些風格前, 只好訓練自己, 成為看懂各式各樣 code 的人,
要能看懂這些風格的 code 前, 需要先了解有哪些派別, 下列列出常見的 c/c++ code 各種風格:
本篇將介紹如何使用 C++ std deque 以及用法與範例,C++ std::deque 是一個雙向佇列(double-ended queue),在頭尾兩端插入及刪除十分快速,在中間插入刪除元素比較費時。
std::deque 是 double-ended queue 而不是 double linked list,底層實做是用間接索引的方式實現的,類似一個 map 索引到若干個固定大小的資料區塊(連續記憶體空間),利用兩次索引達成跟 vector 一樣的隨機訪問功能。
以下將依序介紹幾個 std::deque 容器常用的用法範例,分別為
要使用 deque 容器的話,需要引入的標頭檔:<deque>
以下為 std::deque 內常用的成員函式,
修改器push_back:把一個元素添加到尾端push_front:把一個元素插入到頭端pop_back:移除最後一個元素(尾端)pop_front:移除第一個元素(頭端)insert:插入元素erase:移除某個位置元素, 也可以移除某一段範圍的元素clear:清空容器裡所有元素
容量empty:回傳是否為空size:回傳目前長度
元素存取[i]:隨機存取索引值為i的元素back:取得最後一個元素front:取得第一個的元素
迭代器begin:回傳指向第一個元素(頭端)的迭代器cbegin:回傳指向第一個元素(頭端)的迭代器(const)end:回傳指向最後一個元素(尾端)的迭代器cend:回傳指向最後一個元素(尾端)的迭代器(const)rbegin:回傳指向最後一個元素(尾端)的反向迭代器crbegin:回傳指向最後一個元素(尾端)的反向迭代器(const)rend:回傳指向第一個元素(頭端)的反向迭代器crend:回傳指向第一個元素(頭端)的反向迭代器(const)
以下範例為push_back(), pop_front(), push_front(), pop_back() 用法,
其中 push_back() 與 pop_front() 應該是最常用到的函式了。
另外使用 deque 相對於 queue 的好處是deque可以使用隨機訪問的功能 [i]。1
2
3
4
5
6
7
8
9
10
11
12
13
14
15
16
17
18
19
20
21
22
23
24// g++ std-deque.cpp -o a.out -std=c++11
using namespace std;
int main() {
deque<int> d = {1, 2, 3, 4}; // [1, 2, 3, 4]
d.push_back(5); // [1, 2, 3, 4, 5]
d.pop_front(); // [2, 3, 4, 5]
d.push_front(0); // [0, 2, 3, 4, 5]
d.pop_back(); // [0, 2, 3, 4]
// 印出 deque 內所有內容, c++11 才支援
for (int &i : d) {
cout << i << " ";
}
cout << "\n";
cout << d[0] << " " << d[1] << " " << d[2] << "\n";
return 0;
}
輸出內容如下:1
20 2 3 4
0 2 3
以下範例為 std::deque 容器使用 push_back() 來推放 Student 自定義類別的範例,使用 push_back() 來放進 deque 的最尾端,這個範例限制 deque 最多塞3個,多的會用 pop_front() 給 pop 掉,最後再將 deque 容器的所有的元素印出來。1
2
3
4
5
6
7
8
9
10
11
12
13
14
15
16
17
18
19
20
21
22
23
24
25
26
27
28
29
30
31
32
33
34
35
36
37// g++ std-deque2.cpp -o a.out -std=c++11
using namespace std;
class Student {
public:
Student(int id) { this->id = id; }
int id;
};
std::deque<Student> d;
void deque_push_back(Student a) {
d.push_back(a);
if (d.size() > 3) {
d.pop_front();
}
}
int main() {
Student a1(1), a2(2), a3(3), a4(4);
deque_push_back(a1);
deque_push_back(a2);
deque_push_back(a3);
deque_push_back(a4);
// 印出 deque 內所有內容, c++11 才支援
for (auto &i : d) {
cout << i.id << " ";
}
cout << "\n";
return 0;
}
以下範例是用 for 迴圈配合 deque 容器的迭代器,去遍歷 deque 並且把值印出來,前兩種是從頭印到尾,後兩種是從尾印到頭。從頭端印到最尾端就是使用 begin() 搭配 end() ,從最尾端印到頭端就是使用 rbegin() 搭配 rend() 。
這裡的 begin() / end() 與 cbegin() / cend() 有什麼不同呢?begin() / end() 是回傳 iterator,而 cbegin() / cend() 是回傳 const_iterator,iterator 可以修改元素值,const_iterator 則不可修改,簡單說就是回傳的東西能不能被修改的差異,要用哪種就自行判斷要用哪種了。
cbegin(), cend(), crbegin(), crend() 是 C++11 新增的,要使用時記得編譯器要加入-std=c++11選項。
第一個 for 迴圈裡面的迭代器使用懶人快速寫法auto it = d.begin();,其全名為std::deque<int>::iterator it = d.begin();,如果不想寫這麼長的話,就可以像我一樣用 auto 的懶人快速寫法。1
2
3
4
5
6
7
8
9
10
11
12
13
14
15
16
17
18
19
20
21
22
23
24
25
26
27
28
29
30
31
32
33
34
35
36// g++ std-deque3.cpp -o a.out -std=c++11
using namespace std;
int main() {
deque<int> d = {1, 2, 3, 4};
// 從頭到尾
//for (std::deque<int>::iterator it = d.begin(); it != d.end(); ++it) {
for (auto it = d.begin(); it != d.end(); ++it) {
cout << *it << " ";
}
cout << "\n";
// 從頭到尾
for (auto it = d.cbegin(); it != d.cend(); ++it) {
cout << *it << " ";
}
cout << "\n";
// 從尾到頭
for (auto it = d.rbegin(); it != d.rend(); ++it) {
cout << *it << " ";
}
cout << "\n";
// 從尾到頭
for (auto it = d.crbegin(); it != d.crend(); ++it) {
cout << *it << " ";
}
cout << "\n";
return 0;
}
輸出1
2
3
41 2 3 4
1 2 3 4
4 3 2 1
4 3 2 1
以下範例是用 while 迴圈在 deque 容器裡搜尋/尋找數字為3,這裡的 auto 懶人快速寫法如上範例解釋相同就不贅述了。
在 while 迴圈裡如果有找到就印個有找到的訊息,假如整個 while 迴圈都沒找到,最後可以判斷 it == d.end() 代表整個 deque 容器都遍歷過了也沒有找到,就印個沒找到的訊息。1
2
3
4
5
6
7
8
9
10
11
12
13
14
15
16
17
18
19
20
21
22
23
24
25
26// g++ std-deque4.cpp -o a.out -std=c++11
using namespace std;
int main() {
deque<int> d = {1, 2, 3, 4};
// 從頭到尾
int find_num = 3;
//std::deque<int>::iterator it = d.begin();
auto it = d.begin();
while (it != d.end()) {
if (*it == find_num) {
cout << "Found " << find_num << endl;
break;
}
it++;
}
if (it == d.end()) {
cout << "Not found " << find_num << endl;
}
return 0;
}
輸出1
Found 3
如果將 find_num 變數改成 5 去搜尋/尋找的話則會找不到,輸出結果會變成1
Not found 5
deque 的優點
deque 的缺點
補充資料
[ptt] deque的實作內部結構示意圖
[ptt] 在特定條件下,deque與vector的效能比較
[csdn] STL中list,vector,deque,map,set區別、聯繫和使用場景原理
參考
std::deque - cppreference.com
https://en.cppreference.com/w/cpp/container/deque
deque - C++ Reference
http://www.cplusplus.com/reference/deque/deque/
Deque in C++ Standard Template Library (STL) - GeeksforGeeks
https://www.geeksforgeeks.org/deque-cpp-stl/
其它相關文章推薦
如果你想學習 C++ 相關技術,可以參考看看下面的文章,
C/C++ 新手入門教學懶人包
std::queue 用法與範例
std::stack 用法與範例
std::vector 用法與範例
std::set 用法與範例
std::map 用法與範例
std::unordered_map 用法與範例
std::find 用法與範例
std::thread 用法與範例
std::async 用法與範例
C++ 計算程式執行時間
本篇 ShengYu 要介紹如何使用 python 來讀寫檔案,內容包含開檔、讀檔、寫檔與關檔,這些 python 常用的檔案操作,是 python 基本入門必學的技能,趕快來學習如何用python 讀寫文字檔吧!
本篇內容將分為以下幾部份:
馬上開始吧!
本範例示範用 python 從 input.txt 檔案讀取資料,input.txt 內容如下:1
2
3111/1.txt
222/2.txt
333/3.txt
一開始要 open() 開檔,再來使用 read() 把所有文字讀進來,接著印出來。1
2
3
4
5
6
7#!/usr/bin/env python3
# -*- coding: utf-8 -*-
# 一次讀全部
f = open('input.txt')
print(f.read())
f.close
輸出:1
2
3111/1.txt
222/2.txt
333/3.txt
也是先 open() 開檔,再來每次迴圈使用 readlines() 來讀取一行文字,並且印出來,最後再關檔。1
2
3
4
5
6
7
8#!/usr/bin/env python3
# -*- coding: utf-8 -*-
# 一次讀一行
f = open('input.txt')
for line in f.readlines():
print(line)
f.close
輸出:1
2
3
4
5111/1.txt
222/2.txt
333/3.txt
本範例示範用 python 把文字寫到 output.txt 檔案裡。
一開始是 open() 開檔並且是寫入覆寫模式,之後用 write() 將文字寫入檔案,\n表示換行,最後再 close() 關檔。1
2
3
4
5
6
7
8#!/usr/bin/env python3
# -*- coding: utf-8 -*-
print('開檔,並覆寫')
f = open('output.txt', 'w')
f.write('123')
f.write('456\n')
f.close
輸出的 output.txt:1
123456
一開始是 open() 開檔並且是寫入添加模式,寫入的文字會接在上次檔尾。之後用 write() 將文字寫入檔案,使用 seek()可以移動讀取指針,在呼叫read()可以讀出該位置的文字,最後再 close() 關檔。1
2
3
4
5
6
7
8
9
10#!/usr/bin/env python3
# -*- coding: utf-8 -*-
f = open('output.txt', 'a+')
f.write('123')
f.write('456\n')
f.seek(5)
print(f.read(1))
f.close
輸出的 output.txt:1
2123456
123456
console 輸出:1
6
以上就是使用 python 來讀寫檔案的介紹。
其它相關文章推薦
Python 讀取 txt 文字檔
Python 寫檔,寫入 txt 文字檔
Python 讓程式 sleep 延遲暫停時間
Python 第一支 Python 程式
有時候會需要查看某個檔案的 git 歷史修改記錄,誰修改了這個檔案以及檔案內容修改了什麼,在那一個 commit 裡其他檔案又修改了什麼,本篇介紹如何使用 git 來查看檔案歷史記錄,另外使用圖形化介面 gitk 也可以做到,而且效率更快。
這個只會顯示該檔案被修改的 commit 節點,還不會顯示修改的內容。1
git log <filename>
跟上面指令一樣,只是文字輸出,
不要覺得這個沒用途唷!有時候想要在歷史修改搜尋某個字串,就會需要搭配這個指令。1
git log -p <filename>
之後會列出綠色字為新增部份,紅色字為刪除部份,用/可以輸入關鍵字來搜尋
gitk 這個工具查看某個檔案的修改歷史修改紀錄可以快速地點一個 commit 節點,同時也會顯示出這 commit 節點這個檔案的修改內容。1
gitk <filename>
其他參考
git log - View the change history of a file using Git versioning - Stack Overflow
https://stackoverflow.com/questions/278192/view-the-change-history-of-a-file-using-git-versioning
timeline - How to view file history in Git? - Stack Overflow
https://stackoverflow.com/questions/1786027/how-to-view-file-history-in-git/1786184
其它相關文章推薦
Github 如何更新已經 fork 的專案與原專案紀錄同步
Git 常用指令
Git 修改上次的 commit
Git commit 檔案的某幾個小部分修改